
Nearly every electric guitarist has a love affair with effects pedals. Why? Because we’re always in search of more mojo, color and texture for our tone. Plus, as we imagine new sonic horizons with possibilities of soaring majestic delays or greasy fuzzed out dirt, it’s super fun to research the plethora of stomp box effects available today. The thrill of the hunt and the quest for sonic inspiration are powerfully seductive forces to us.
Roll-your-own pedal boards have been a staple of garage bands and local heroes for decades. After deciding which combination of effects will enhance or define your sound, your inner “tech” will be determined to wire everything together, plug in, and conquer the Colosseum. Unfortunately, typical DIY pedalboards are plagued by hum, hiss, noise and tone-suck. Each pedal may sound splendid on its own, but multiple pedals don’t always play nicely together.
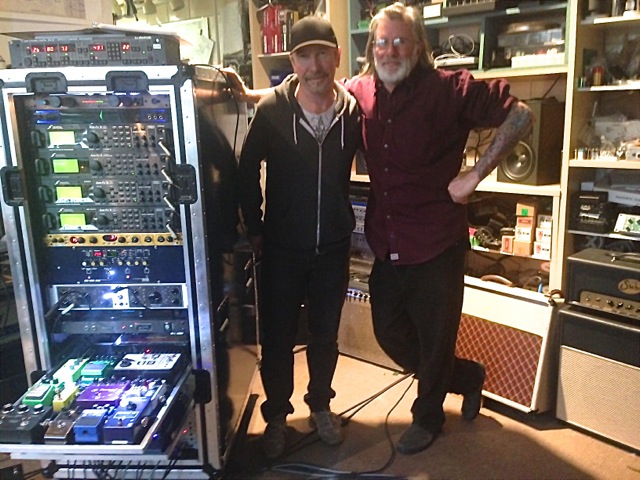
Fortunately, the merciful Almighty Lord bestowed upon us Robert “Bob” Bradshaw to save the day. Bob, founder of Custom Audio Electronics (CAE), is famous for designing and building custom refrigerator-size, remote switching systems and compact pedalboards for touring and recording artists including U2’s The Edge, Police’s Andy Summers, Toto’s Steve Lukather and L.A. session cat Michael Landau.
Bob and I were introduced by mutual friend Gil Griffith, who at the time was VP of Marketing for Eventide. Gil, a talented musician in his own right, had the brilliant idea of getting Steve Vai to create 48 new, unique presets for the H3000 Harmonizer, which catapulted the product straight to the top of every pro guitarist’s wish list. Even more impressive than its meteoric rise to coveted status was the fact that the Harmonizer sold amazingly well, despite its $3000 price tag 25 years ago. Anyway, Gil asked me to demonstrate the H3000 at the 1993 NAMM Show, and he firmly nudged me to connect with Bob to get “Rackzilla” professionally wired by CAE.
Rackzilla, my 16-space “refrigerator” rack, consisted of instrument level amps and pedals, as well as line level “studio” effects that technically do not belong in the same system. To further complicate matters, some pedals needed to be mounted on the large pedalboard at my toes while others were able to reside on a tray inside the rack behind me. Some effects, like overdrive, were inserted between the guitar and the amp, while other FX, like delays and reverb, entered the signal path at the amp’s Effects Loop, which is located in between the guitar amplifier’s preamp and power section. Plus, there were long cable runs that were ready to dull my tone or to tune in to any one of SoCal’s local Mariachi radio stations. There was plenty of potential for a train wreck.
For the curious folks among us, among Rackzilla’s noteworthy pieces were a Mesa Triaxis MIDI controlled preamp, Mesa Strategy Stereo 2:90 power amp, CAE RS-10 foot controller, two CAE 4×4 audio loop switchers, CAE Black Cat Vibe, CAE Super Tremolo, Eventide Orville Harmonizer, Lexicon PCM80, assorted boutique stompbox pedal effects, wah, volume and expression pedals.
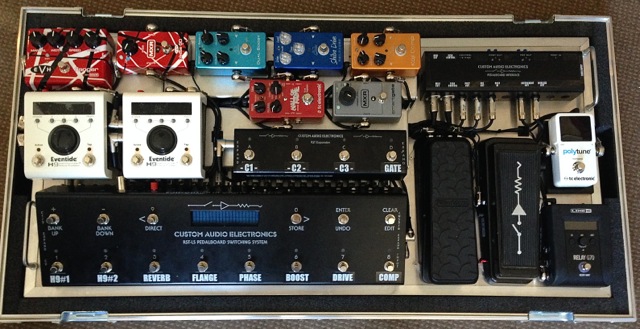
A second compact “fly date” pedalboard-only alternative to Rackzilla was designed to interface with a small combo amp (Matchless DC30 or Mesa Mark 1 Reissue). It contained only what I considered to be essential at the time. Its signal flow in 1996 was Thru > Mesa V-Twin > Black Cat CAE Freddy Fuzz > Demeter Tremulator > Black Cat Vibe > CAE-modifed Vox Wah > Volume pedal > Delay True Bypass Loop (Boss DD-5) > to the Amp. Everything was powered by custom CAE 9V and 12V power supplies, with some strategically isolated taps to keep the tremolo and the digital delay quiet. The only changes I made to the board over the past 20 years are minor: V-Twin is now a Fulltone Full-Drive 2, the Boss digital delay is now an analog Maxon AD-80, there’s now a Sonic Research ST-300 Turbo Tuner, and I’ve added a Dunlop CAE MC-401 Boost/Line-Driver to serve as a bypassable buffer. When the effects are bypassed, the guitar tone through the pedalboard virtually identical to the sound of plugging directly into the front of the amplifier.
Depending on your perspective, my pedalboard is either simple or complex. I can assure you that my pre-CAE attempts to wire it were disastrous. The effects boxes looked pretty, but they were noisy when placed in close proximity on the board. Rather than wasting my life force on scaling a steep learning curve, I hired Bob to get it right for me so that I could get back to the business of making music instead of determining which offenders required isolated power taps or a change of scarce real estate. I didn’t mind paying his fee–you can always get more money, but you can never get back your time.
The pro tip here is to build a functional team of talented specialists. This practice allows you to focus on your strengths. Other specialists will fill in the gaps in your skill set, aptitude or temperament. Super producer Quincy Jones is a prime example of someone who utilizes the skills of all-star writers, engineers, musicians, arrangers, et al., to ensure that his joints are the best they can possibly be. If you’re not convinced, listen again to Michael Jackson’s Thriller or Off The Wall. Then read the list of credits. It’s akin to the Hall Of Fame. The workload is handled by a team, yet Quincy’s credit is undiluted. Next to Michael, Q is the star.
Applying this principle to a pedalboard, it makes sense to hire a specialist like CAE/Bob right away, before wasting your time, money and psychic energy. Cry over the money once instead of spending it twice! If you choose to take the DIY route, you may get lucky, but think about this: you should be playing your instrument and writing hit songs, not toiling with physics considerations like line vs instrument level, routing of audio vs power lines, sequence of pedals, buffer vs true bypass, switching logic, FX loops, power isolation, finicky germanium transistors, and much more. Wear leather pants, not a lab coat!
Long story short, Bob and his crew designed noise-free plug-and-play systems for me that were bombproof and idiot-proof. Both Rackzilla and my compact pedalboard traveled internationally without incident. A forklift punched a hole through Rackzilla before pushing it off the edge of an elevated loading dock, but the system functioned perfectly.
If I were to elaborate on why I continue to rely on Bob’s services and products in only two words, those words would be: confidence inspiring.
Bob was kind enough to answer a few questions. Good info for any guitarist who uses effects in the signal path…
MJ: What are your thoughts about the shift from rack systems to traditional pedalboards? Is there still a compelling reason to consider a rack system?
BB: Basically, we are at the mercy of the manufacturers that provide us with the tools we use to make music. When I started out around 1980, there were really only pedals to work with. I started implementing “rack mount” gear into guitar rigs because I was working with studio players here in Los Angeles who saw engineers using rack mounted outboard gear on the recordings they were working on, and wanted the same sounds in their rigs for themselves. I had to learn how to deal with level and impedances in order to get pedals and studio gear to play nice with each other. Manufacturers saw this trend, and started producing “rack mounted” gear specifically for guitar players and the “rack mount” boom was born.
Of course now, it’s back to pedals.You can’t really find decent rack mounted single purpose effects for guitar players being manufactured anymore. That stuff is all on the used market. What happened was, the manufacturers started squeezing too many effects into one chassis and quality went way down, and soon “rack” stuff got a bad rap. It is the same with everything: too much of a good thing, so the trend started tilting back to pedals. Also there is a size/weight difference here, as players started scaling back the size of their rigs. If you travel with your gear, you know what I mean. With rack mounted stuff, you are dealing with a standard size based on increments of 1.75” x 19” (no matter what is in the chassis) vs. a pedal chassis which could be any size. Then there is instant gratification and we all want that! It is much more fun to grab a knob and turn it, than it is to scroll through menus, etc. And a pedal for the most part represents a much smaller investment too. You can buy a pedal for $200 or so, where a rack mounted piece may cost you $800 or more.
Today there are many pedals that rival their “rack mounted” counterparts in terms of sound quality and flexibility. But don’t get me wrong: there are a lot of bad pedals out there now as well. To me, there is no difference in building a rack vs a pedalboard. The signal still has to get from point A to point B relatively unmolested (unless you want to screw it up!). Signal doesn’t care if it goes through a rack or a pedalboard.
MJ: Who needs a loop switcher (programmable or not) on a pedalboard, and who can get by with an inline true-bypass rig?
BB: Anybody that cares about the quality of their un-affected sound. I maintain that a well designed loop system stands a better chance of retaining your original guitar signal than daisy chaining your pedals together.Even if all your pedals have “true bypass”. This is because a loop system bypasses not only your pedals,but the cables connecting them too! And proper buffering at select points in the signal chain is important too, loop system or not. If you just have a few pedals, you can probably get away without a loop system, as they do add to the size/weight of your board.
But generally speaking in any case, buffers somewhere in the signal path are essential.
MJ: Are you concerned about digital clock noise in a primarily analog signal path?
BB: That has never been a big concern for me. I am more concerned with 60hz. hum!
MJ: Anything newsworthy you’d like to share?
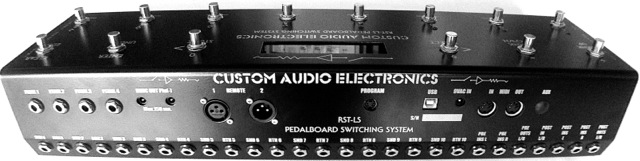
BB: Trends come and go. While I may be best known for large elaborate systems (many of which are “rack mounted”) I have also pioneered smaller programmable pedal based systems that are easily as powerful as any rack . And they come in a wide variety of sizes and are not as expensive as you might think. The latest is called the RST-LS which contains 10 mono bypass loops, 4x switchable outputs and 2x Control Functions. It contains mono and stereo audio inserts for patching in devices that don’t require bypass loops, and is a full function midi controller. I also have coming in the fall an expression control pedal which automates your existing expression pedal with separate rate and depth controls and tap tempo. It is called AutoSweep.
Contact Bob Bradshaw:
bob@customaudioelectronics.com
Facebook: https://www.facebook.com/CustomAudioElectronics
Instagram: #customaudioelectronics
Twitter: @THEcustomaudio